
Want to win Halloween next year? Embark on a DIY costume journey
Were the fairies of Pixie Hollow an integral part of your childhood? Are you new to sewing and willing to take advice from someone who is also new at sewing? Did you read this article from The Trojan Times and realize that 81% of people believe that costumes are a requirement for trick-or-treating? Is your entire self-worth derived from being artsy and creative or from people complimenting the things that you’ve made?
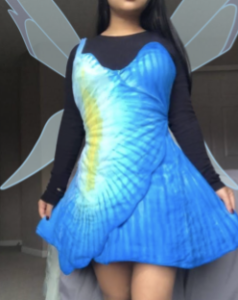
If you’ve answered yes to these questions, boy, have I got the tutorial for you (it’s this one). This is the process by which I made Silvermist’s iris dress for this Halloween, and although it is made to emulate one specific character, it is an easily modifiable process which could be adapted to make many different costumes.
Step 1:
Gather your materials. You will need
- A plain bedsheet. If you wish to do exactly what I did, ask your parents drive all the way to Hobby Lobby to buy fabric because you’re still too scared to drive on the big-girl roads even though you’ve had your license for months, and then have your mother remember that she has an old bedsheet that you could use instead.
- Thread and needles
- Acrylic paint
- Fabric dye (make sure it is compatible with the material composition of your bed sheet fabric)
- Scissors
- Sewing machine (Optional, but recommended if you don’t want to hate yourself)
Step 2:
Cut out the following shapes out of your bedsheet. If you plan on making the dress with a lining layer to protect your seams, cut the number shown.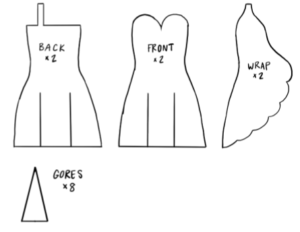
A lining layer is a layer that sits between the outside of the dress and your body. It has several uses, but for this case it is mostly an easy way to protect the seams so they don’t fray. The general idea is to sew two identical dresses, and then sew them together inside out, leaving a gap so that you can turn it rightside out, trapping any seams between the two layers. The process is similar to making a pillow like in this video, except we don’t put anything in the pocket created, and we do this process twice, once with the wrap piece and once with the main body of the dress.
If you would rather not sew a lined dress, you may halve the number next to each item. However, I still recommend finishing the seams in some way so that they will not come apart when washed.
The easiest way to make sure the dress will fit you is to outline a dress that you like the fit of, and then alter the neckline, hemline, sleeves, etc., as needed so it looks like whatever costume you’re making. Use something that loosely fits, as you need to be able to put it on and take it off.
It should also be noted that this dress has gores (triangular inserts attached to the slits in the skirt intended to add more flare). If you omit this, just don’t cut out the triangles or the slits in the skirt pieces.
Step 3: 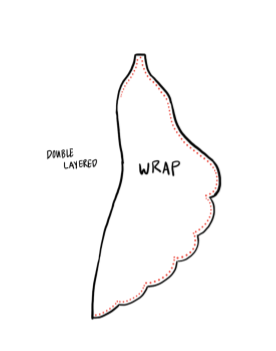
Line up the wrap pieces so that they stack nicely on top of each other, and sew on the dotted line.
Step 4:
Make a small cut every inch or so, going from the exposed seam to, but not through, the line that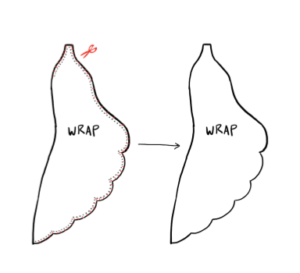 you just sewed. Then turn the piece inside out, trapping the seam between the two layers.
The purpose of these small cuts is so that the curves will lay flat instead of bunching up when you turn the piece inside out.
Step 5:
At the risk of sounding pretentious, I will quote a classic here: “And [you] stitch it in the front and back/ and it turns into a gown!”- Erica in Barbie as the Princess and the Pauper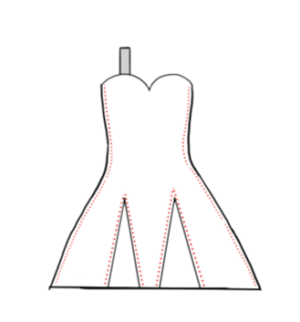
In reality, after sewing a back piece to a front piece, you will be left with something resembling a misshapen tube. But don’t give up now, because you’ve still got to attach one of the gores to every slit, making sure that the seams created by this are facing outwards.
Step 6:
Repeat step three, but make sure to inverse the pieces from the last one so that the new dress-tube will be a mirror twin of the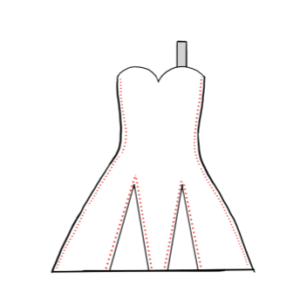 first one. The purpose of this is so that when you eventually flip one of them inside out and sew them together, the exposed seams will be trapped between the two layers and the two layers of the dress will finally line up.
Step 7:
Realize that you messed up.
Step 8:
Choose the prettier twin (there’s always a prettier twin).
Step 9: 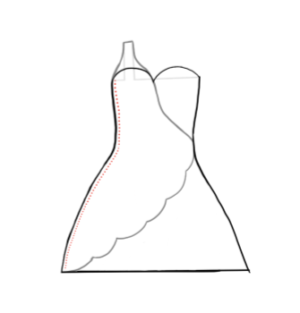
Rip apart one of the side seams on the dress-tube you have chosen. Then line them up again and sew it together again, but sandwich the wrap piece between the front and back piece.
Step 10:
Flip one of the tubes inside out so that they are symmetrical, then maneuver one to encompass the other. The sides of each tube with the seams must be facing away from each other, and the two should line up perfectly, but if they don’t, know that you are still loved, you are still amazing, and you are still worthy of good things.
Step 11:
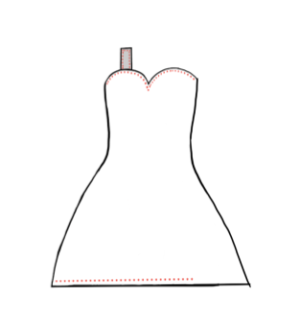
Sew the neckline of the two layers together, folding down the strap so that it doesn’t get sewn into the neckline, and then sew the hemline together, leaving a gap. I won’t tell you how large to make it, because it will never actually be enough. That is, unfortunately, a fact of life. You can also use the same technique of cutting towards the seams mentioned in step 4 on the neckline and the strap.
Step 12:
Reach inside the gap to turn the dress inside out.
Step 13:
Contemplate how your sister is going to college to be a doctor and will do amazing things, like delivering babies into this beautiful world, and how the desperate, sweaty, frustrating experience of trying to get an entire dress to fit through a gap – which you now realize was made just slightly too small – will be the closest you will ever get to helping someone deliver a child (thank God for that).
Step 14:
Breath a sigh of relief at the beautiful dress you’ve made. It should have two layers, and the seams will be trapped between them.
You’ve made it past the worst part. You’ve braved the eye of the hurricane (or is it a tornado?) and come out stronger than ever.
Step 15: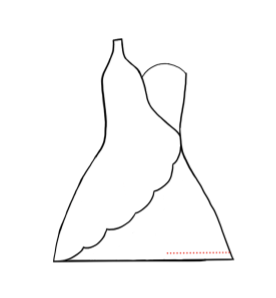
Sew the gap closed and sew the strap together.
Step 16:
Dye the dress according to the instructions on the packet. I strategically fastened the dress so that there would be a part that hung above the water level, remaining undyed.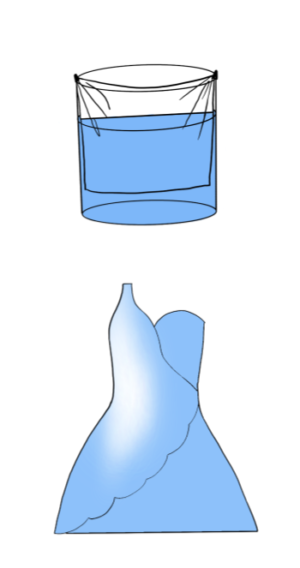
Step 17:
Once it has been washed, dried, and ironed**, mix together 3 parts water and 1 part acrylic paint and use it to paint the flower’s veins. You may lightly spray water onto the dress to get the color to diffuse slightly.
In addition to painting the veins, painting the edges of the wrap dress, the neckline, the hemline, and the fabric near where the wrap and main dress overlap, will all make the paint look more natural and add more dimension
** this is the last time you will be able to iron the dress, as acrylic is plastic based, and doesn’t mix well with heat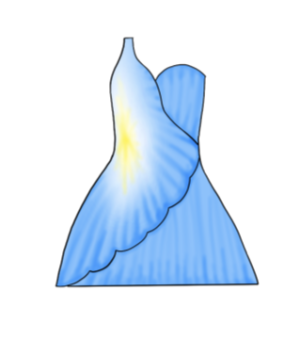
Step 18:
Repeat step 17, letting the dress dry between each layer of paint. The more paint you add, the more crunchy the dress will be.
Step 19: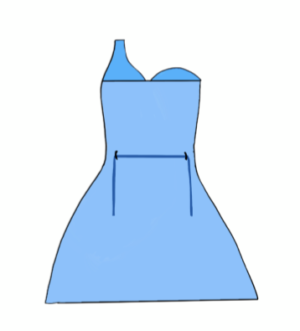
When it dries, sew two loops, each roughly five strands of thread, on either side of the dress at waist level, and pull a string through both. These will work as belt loops to keep the dress fitted while also making it easy to take on and off.
Step 20:
Run out of time to make wings and Photoshop them into all of your pictures.
However, you can opt out of this step and instead use one of the following tutorials to make a pair of wings:
https://www.youtube.com/watch?v=2rK3Koshiag
https://www.youtube.com/watch?v=WUkpE2HEMck
https://www.youtube.com/watch?v=O2t8drrFdWk
Conclusion:
Overall, I would suggest putting aside two weekends to work on a project like this, with one weekend being the bare minimum.
And, as stated above, this process can also be used to make many other costumes! By simply removing the wrap dress from the equation, you get a versatile dress which, when paired with other features and colors, can be used to make most of the other dresses of the Pixie Hollow fairies, and many other costumes.
Whether you’re making costumes from scratch or assembling the pieces, if you wear them for Halloween or conventions, I am a firm believer that making and wearing costumes is something we should aspire to do much more often because it makes everything just a little more fun.